Creating a Kubernetes Cluster in AWS Environment
Step by Step Tutorial
In this article you will learn everything you need to create your Kubernetes cluster in a simple way with the step by step below:
- Overview about Kubernetes and Containers
- How to create a cluster with kubeadm
- Configuring a Container runtime
- Installing kubeadm, kubelet and kubectl
- How to add the Addon networking
- Creating and Attaching a Worker Node
- Creating your first Pod
Before we start the configuration steps, let’s see an overview aboutKubernetes andContainers.
Containersare similar to VMs, but they have relaxed isolation properties to share the Operating System (OS) among the applications. Therefore, containers are considered lightweight. Similar to a VM, a container has its own filesystem, share of CPU, memory, process space, and more.
The benefits of using containers are many, below I mention just a few:
- Continuous development, integration, and deployment: provides for reliable and frequent container image build and deployment with quick and efficient rollbacks.
- Agile application creation and deployment: increased ease and efficiency of container image creation compared to VM image use.
- Observability: not only surfaces OS-level information and metrics, but also application health and other signals.
- Dev and Ops separation of concerns: create application container images at build/release time rather than deployment time, thereby decoupling applications from infrastructure.
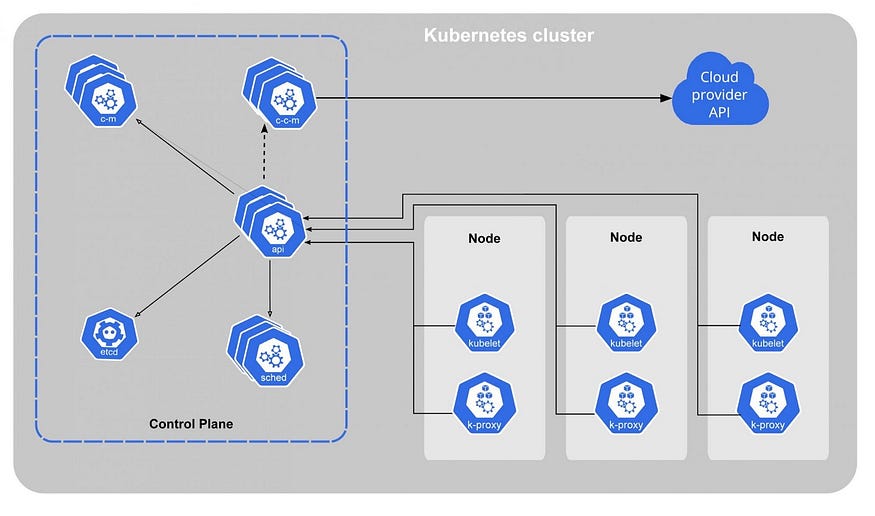
Kubernetesis an open source container orchestration engine for automating deployment, scaling, and management of containerized applications.
Kubernetes provides you with:
- Service discovery and load balancing: can expose a container using the DNS name or using their own IP address.
- Storage orchestration: allows you to automatically mount a storage system of your choice, such as local storages, public cloud providers, and more.
- Automated rollouts and rollbacks: you can describe the desired state for your deployed containers using Kubernetes, and it can change the actual state to the desired state at a controlled rate.
- Automatic bin packing: you provide Kubernetes with a cluster of nodes that it can use to run containerized tasks. You tell Kubernetes how much CPU and memory (RAM) each container needs.
How to create a cluster with kubeadm
The first step is to have at least 2 server nodes to install the prerequisites to run Kubernetes. One node will be theMaster and the other theWorker node.
I used AWS Cloud Computing to run on EC2 instances, but you can use another cloud provider or on-premises VMs.
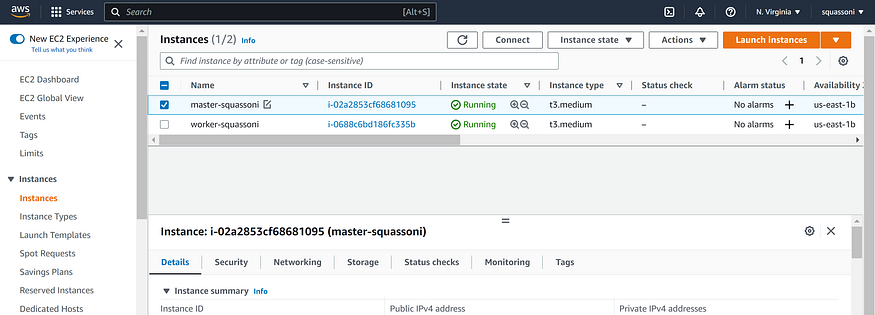
I usedt3.mediumwith 2 vCPUs 4 Memory (GiB) and Ubuntu Server 20.04.
Once you have your servers, first access the Master node and update all packages:
sudo apt-get update && sudo apt-get upgrade
We must disableswapin order for the kubelet to work properly.
# Disable swap
 swapoff -a

# To verify
 sudo cat /etc/fstab
Configuring a Container runtime
To run containers in Pods, Kubernetes uses a container runtime.
By default, Kubernetes uses theContainer Runtime Interface (CRI) to interface with container runtime.
We will usecontainerd, so we need to install it on each cluster node.
First, configure prerequisites forwarding IPv4 and letting iptables see bridged traffic:
cat <<EOF | sudo tee /etc/modules-load.d/k8s.conf
overlay
br_netfilter
EOF

sudo modprobe overlay
sudo modprobe br_netfilter

# sysctl params required by setup, params persist across reboots
cat <<EOF | sudo tee /etc/sysctl.d/k8s.conf
net.bridge.bridge-nf-call-iptables  = 1
net.bridge.bridge-nf-call-ip6tables = 1
net.ipv4.ip_forward                 = 1
EOF

# Apply sysctl params without reboot
sudo sysctl --system
Thecontainerd.io packages in DEB and RPM formats are distributed by Docker, set up the repository:
- Install packages to allow
aptto use a repository over HTTPS:
sudo apt-get install \
    apt-transport-https \
    ca-certificates \
    curl \
    gnupg \
    lsb-release
2. Add Docker’s official GPG key:
sudo mkdir -p /etc/apt/keyrings
curl -fsSL https://download.docker.com/linux/ubuntu/gpg | sudo gpg --dearmor -o /etc/apt/keyrings/docker.gpg
3. Use the following command to set up the repository:
echo \
  "deb [arch=$(dpkg --print-architecture) signed-by=/etc/apt/keyrings/docker.gpg] https://download.docker.com/linux/ubuntu \
  $(lsb_release -cs) stable" | sudo tee /etc/apt/sources.list.d/docker.list > /dev/null
4. Update theapt package index and install the containerd.io:
sudo apt-get update

sudo apt-get install containerd.io
5. Download thecni-plugins-linux-amd64-v1.1.1.tgz archive fromhttps://github.com/containernetworking/plugins/releases , verify its sha256sum, and extract it under/opt/cni/bin:
mkdir -p /opt/cni/bin

wget https://github.com/containernetworking/plugins/releases/download/v1.1.1/cni-plugins-linux-amd64-v1.1.1.tgz

tar Cxzvf /opt/cni/bin cni-plugins-linux-amd64-v1.1.1.tgz
6. Configuring the systemd cgroup driver:
vim /etc/containerd/config.toml

# Enable the cni plugin by commenting out the line below

   #disabled_plugins = ["cri"]

# To use the systemd cgroup driver in /etc/containerd/config.toml with runc, set:

   [plugins."io.containerd.grpc.v1.cri".containerd.runtimes.runc]
   [plugins."io.containerd.grpc.v1.cri".containerd.runtimes.runc.options]
   SystemdCgroup = true
7. Restart containerd service:
sudo systemctl restart containerd
Installing kubeadm, kubelet and kubectl
Usingkubeadmto set up a cluster that conforms to best practices and that will pass the Kubernetes Conformance tests.
Also supports other cluster lifecycle functions, such asbootstrap tokens and cluster upgrades.
- Download the Google Cloud public signing key:
sudo curl -fsSLo /etc/apt/keyrings/kubernetes-archive-keyring.gpg https://packages.cloud.google.com/apt/doc/apt-key.gpg
2. Add the Kubernetesapt repository:
echo "deb [signed-by=/etc/apt/keyrings/kubernetes-archive-keyring.gpg] https://apt.kubernetes.io/ kubernetes-xenial main" | sudo tee /etc/apt/sources.list.d/kubernetes.list
3. Updateapt package index, install kubelet, kubeadm and kubectl:
sudo apt-get update
sudo apt-get install -y kubelet kubeadm kubectl
sudo apt-mark hold kubelet kubeadm kubectl
4. Pull images used by kubeadm:
sudo kubeadm config images pull
5. To initialize the control-plane node run:
kubeadm init
6. To make kubectl work for your non-root user, run these commands:
mkdir -p $HOME/.kube
sudo cp -i /etc/kubernetes/admin.conf $HOME/.kube/config
sudo chown $(id -u):$(id -g) $HOME/.kube/config
7. Alternatively, if you are theroot user, you can run:
export KUBECONFIG=/etc/kubernetes/admin.conf
8. You can test kubectl with a simple command:
# Running to get information about the attached nodes in the cluster
kubectl get nodes
How to add the Addon networking
We must deploy a Container Network Interface (CNI) based Pod network add-on so that your Pods can communicate with each other.
Cluster DNS (CoreDNS) will not start up before a network is installed.
We will install the Addon Weave Net 2.8.1, running the command:
kubectl apply -f https://github.com/weaveworks/weave/releases/download/v2.8.1/weave-daemonset-k8s.yaml
Congrats! Now you have completed all the steps to have a successfully configuredControl Panel.

To see all namespaces in your cluster, run the command:
kubectl get namespaces
Creating and Attaching a Worker Node
To create your firstWorker Node you will need to rerun all the steps performed on the Master Node —except installing kubectl — all cluster management will be done through Master Node.
That’s a lot of commands to rerun, right? I know it takes a lot of work.
For a learning context, it’s okay to do it manually, but as the number of nodes increases it becomes more difficult to repeat the step by step without making mistakes.
So you can use an automation solution to do that, like scriptinguser data before starting an EC2 on AWS, or you can create anAnsible playbook, there are many possible solutions.
Once your worker node is created, we will need to create atoken to be used for mutual authentication between the control-plane node and joining nodes:
# Run the command in Master Node
kubeadm token create --print-join-command
Get the token and run the command below to attach the Worker Node to the Cluster:
# Run the command in Worker Node
kubeadm join --token <token> <control-plane-host>:6443 --discovery-token-ca-cert-hash sha256:<hash>
You can join as many nodes as you need!
Creating your first Pod
Pods are the smallest deployable units of computing that you can create and manage in Kubernetes, is a group of one or more containers.
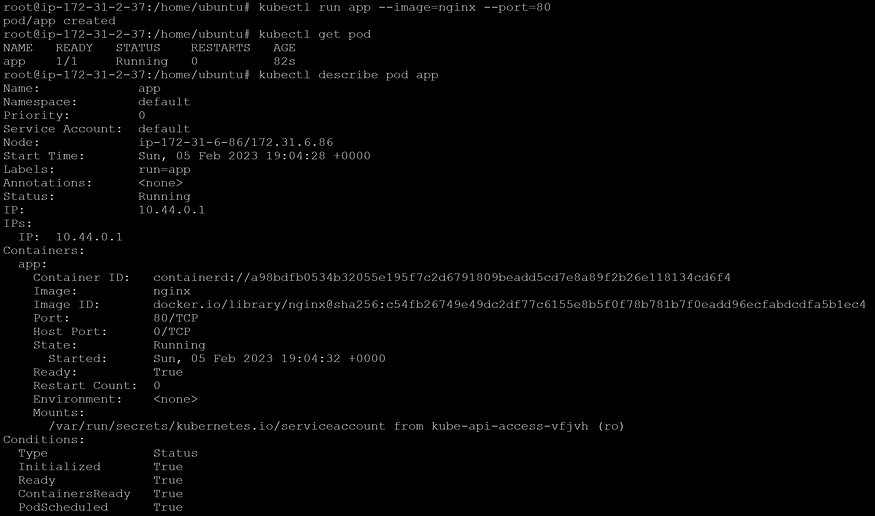
We will create an example of a Pod which consists of a container running the imagenginx:latest:
kubectl run app --image=nginx --port=80
To check pod status:
kubectl get pod
To describe your pod:
kubectl describe pod app